Advanced troubleshooting
This article lists advanced troubleshooting actions that you can take with the guidance of the Technical Support team.
Change options on the Xen® command line
XenServer® is based on the open-source Xen hypervisor. As part of diagnosing or working around issues, you might be asked to add parameters to the Xen command line.
We strongly recommend that you only change your Xen command line under the guidance of Technical Support. Setting or changing any options that are not listed in the XenServer product documentation or given by Technical Support is not supported. In addition to rendering your environment ineligible for support, these changes to Xen command line arguments can make your hosts unbootable or potentially vulnerable to security threats.
To add options to the Xen command line of your host, complete the following steps:
- Log in to the XenServer host console, either by using SSH or the Console tab in XenCenter.
- Run the following command with the parameters and values advised by Technical Support:
/opt/xensource/libexec/xen-cmdline --set-xen <parameter>=<value> -
The command returns silently, but you can verify that your parameters are set by checking your
grub.cfgfile.- If you are using legacy BIOS boot mode for your host, run the following command:
more /boot/grub/grub.cfg - If you are using UEFI boot mode for your host, run the following command:
more /boot/efi/EFI/xenserver/grub.cfg
The parameter you specified appears in the
XenServerandXenServer (Serial)sections of the file. - If you are using legacy BIOS boot mode for your host, run the following command:
- Reboot your XenServer host to make your changes take effect.
To remove options from the Xen command line of your host, complete the following steps:
- Log in to the XenServer host console, either by using SSH or the Console tab in XenCenter.
- Run the following command with the parameters and values advised by Technical Support:
/opt/xensource/libexec/xen-cmdline --remove-xen <parameter> -
The command returns silently, but you can verify that your parameters are removed by checking your
grub.cfgfile.- If you are using legacy BIOS boot mode for your host, run the following command:
more /boot/grub/grub.cfg - If you are using UEFI boot mode for your host, run the following command:
more /boot/efi/EFI/xenserver/grub.cfg
- If you are using legacy BIOS boot mode for your host, run the following command:
- Reboot your XenServer host to make your changes take effect.
Gather logs when XenServer is failing to boot
If your XenServer host is not booting successfully, you can still gather logs from it by attempting to boot from the installation ISO.
- Download the installation ISO from https://xenserver.com/downloads.
- Boot your XenServer host from the installation ISO. For information about methods of booting from the ISO, see step 2 in Install the XenServer host.
- When the first dialog appears on the screen, press Alt+F2. The installation process switches you to a shell console.
-
Verify whether the installation ISO can see the local or remote disk. Run the following command:
fdisk –lIf the local and remote disks are visible, this command lists the visible partitions. These partitions usually have names of the form
/dev/sdaX. - Identify the root partition on the local disk. The root partition is usually
/dev/sda1, but can be different on different hardware. -
Mount the root partition in a temporary mount point
/mntto access the local disk:mkdir /mnt mount /dev/sda1 /mnt ls /mnt -
Change the temporary root file system to the file system on your disk:
chroot /mnt -
Create a server status report by running the following commands:
mount –t sysfs none /sys
xenserver-status-report --yestoall
The command prints the location of the tarball containing the server status report.
- Prepend
/mntto the path given by the previous step to get the path to the file in the temporary root file system, for example:/mnt/var/opt/xen/bug-report/bug-report-xxxx.tar.bz2 -
Set up a temporary IP address to copy the server status report over the network to your desktop.
-
If you have DHCP running in the network, run the following command:
dhclient eth0 -
If there is no DHCP, manually configure the IP address:
 ifconfig eth0 <x.x.x.x> netmask <x.x.x.x> up
 route add default <x.x.x.x>
-
- Using an SCP client, connect to the previously configured IP address and copy the status report to your local desktop.
Configure serial console access
Serial console access to the XenServer host can be useful for debug purposes. You can use the serial connection with HyperTerminal (or a similar application) to collect XenServer logs.
You can use a physical port to connect to your host. If you are using this method, you need the following things:
- 9-pin Serial Null Modem Cable.
- Serial COM Port on a system that is running software for connecting to the serial port, for example, Microsoft HyperTerminal.
- Serial COM Port on a XenServer host.
If your hosts do not have a physical serial port or suitable physical infrastructure is not available, investigate whether you can configure an embedded management device with your hardware. This method is also known as Serial over LAN. If you are using this method, you need the following things:
- A virtual serial port provided by a baseboard management controller such as Dell iDRAC or HP iLO.
- A computer with appropriate software to connect to the virtual serial port, for example,
ipmitool.
Note:
By default, XenServer assumes a serial baud rate of 115200. If a different baud rate is required, adjust the value of
<speed>in thegrub.cfgfile. If needed, seek the guidance of the Technical Support team.
To set up a serial connection, complete the following steps:
-
If you are not using COM1 on your server, edit your
grub.cfgfile.- For legacy BIOS boot the
grub.cfgfile is in the/boot/grubdirectory. - For UEFI boot the
grub.cfgfile is in the/boot/efi/EFI/xenserverdirectory.
- For legacy BIOS boot the
- Locate the following line:
serial --unit=0 --speed=<speed> -
Edit the value of
--unitto ben-1, where<n>represents your COM port number.For example, to use COM2, set the value of –unit to be 1:
serial --unit=1 --speed=<speed> -
Locate the line in the
menuentry 'XenServer (Serial)'section where the following text is displayed:com1=<speed>,8n1 console=com1,vga -
Replace
com1withcom<n>, where<n>represents your COM port number. -
Start or reboot the XenServer host.
-
From the grub menu, select XenServer (Serial).
- XenServer starts with serial console support.
You can now use your chosen method to connect to the serial console.
Generate a crash dump from the serial console
If a XenServer host crashes, the running kernel can migrate into a special memory area that is based on kexec functions. It loads a special kernel without the need for a server restart. This new kernel attempts to gather as much detail about the crash as possible (memory dumps, process list) and save it into the /var/crash directory.
Sometimes, XenServer hangs and does not reboot after a crash. When this situation happens, the server is unresponsive but still running and only a reboot of the server can resolve the issue. In addition, there might be no crash dumps are available on the server: there is no dump in the /var/crash directory and the xe host-crashdump-list contains no information about the crash.
In this situation, you can force a crashdump that saves information about the crash, which can then be analyzed.
After switching into the serial console, complete the following steps:
- Wait until XenServer becomes unresponsive.
- Press Ctrl+A three times to switch to the Xen hypervisor menu. You see this message on the serial console:
*** Serial input to Xen (type 'CTRL-a' three times to switch input) - Press h to display all available operations.
- Press Shift+C to trigger a crashdump.
- Wait until the XenServer host reboots and save all data on a local file system.
- Check for the new crash dump on the server in the
/var/crashdirectory.
Switch to the debug hypervisor
In some situations, it might be useful to switch the host to using the debug hypervisor and attempt to reproduce the issue. The debug hypervisor performs more built-in checks and is more verbose in its output.
To enable the debug hypervisor on your host, complete the following steps:
- Log in to the XenServer host console, either by using SSH or the Console tab in XenCenter.
- Change directory to the
/bootdirectory:cd /boot -
Verify that you have the debug module xen-debug.gz file available:
ls -l xen*This command shows the available hypervisor versions and the symbolic links that are used when booting the host. In normal operation,
xen-release.gzlinks to the release hypervisor file,xen-<version>.gz, andxen-debug.gzlinks to the debug hypervisor file,xen-<version>-d.gz. The debug hypervisor is the same version as the release hypervisor, but has an additional-dincluded in the file name.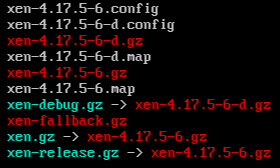
- Change the
xen.gzlink to point to the debug hypervisor:ln -sf /boot/xen-debug.gz /boot/xen.gz - Reboot your host.
After using the debug hypervisor to perform the actions recommended by Technical Support and gather more diagnostic information, switch your hypervisor back to the release hypervisor before returning to normal operation.
To return to the using the release hypervisor on your host, complete the following steps:
- Log in to the XenServer host console, either by using SSH or the Console tab in XenCenter.
- Change directory to the
/bootdirectory:cd /boot - Change the
xen.gzlink to point to the release hypervisor:ln -sf /boot/xen-release.gz /boot/xen.gz - Reboot your host.