Apply updates by using XenCenter®
Keep your XenServer 8.4 hosts and pools up to date with the latest version of XenCenter, available from the XenServer product downloads page.
Complete the following steps to update your XenServer® pools:
-
Configure updates for your pool.
You can configure updates for a pool or standalone host from the following locations:
- An update channel on the content delivery network (CDN). This method is recommended for internet-connected pools.
- An offline update from a downloaded bundle This alternative method is intended for use when internet connectivity to your XenServer hosts is unavailable or restricted.
- An existing pool. This method enables you to bring a standalone host or a pool up to the same level of updates as another pool that is at a higher level of updates. It is recommended for joining a newly installed host to a pool that is not at the latest level of updates.
Configure updates for your pool
Updates from the CDN
Prerequisites
- Ensure that your XenServer® hosts have internet access and can connect to the required update domains.
- If your hosts are behind a firewall, allow access to subdomains of
ops.xenserver.com. For more information, see Connectivity requirements.
Note:
Applying updates is only assured to work when the previous state of the pool is less than six months old. If you haven’t applied updates for more than six months, updating to the latest update level is not tested and is not assured.
Follow these steps to configure your hosts for applying updates from the CDN:
-
In XenCenter®, on the Tools menu, select Configure Updates. Alternatively, go to the Updates section under your pool’s General tab and select Configure Updates or right-click on your pool and select Updates > Configure Updates. The Configure Server Updates window opens.
-
On the XenServer 8.4 tab, select the pools or hosts that you want to configure.
-
Under Update Channel, specify how soon you want to access updates. Your pool or host can be subscribed to one of the following update channels:
-
Under Synchronization Schedule, select how often you want your XenServer pool to synchronize with the update channel. This can be daily, or weekly on a certain day of the week.
Note:
-
After synchronizing, apply the updates to your pool as soon as possible to benefit from the latest updates.
-
If you designate a new pool coordinator after synchronizing but before applying updates to the hosts in the pool, you must synchronize again with the new pool coordinator before you can update the pool.
-
Do not synchronize your XenServer pool while the pool is in the process of being updated.
-
-
(Optional) Under Proxy Server, specify a proxy to use when synchronizing with the update channel. This proxy server is used for communication between the host and the public CDN.
-
Click Apply to apply the configuration changes to your XenServer pool and then repeat the above steps to configure updates for the rest of your XenServer pools.
-
If you are happy with the configuration changes to your pools, click OK to save your changes and close the Configure Server Updates window. When you first set up your host or pool with an update channel (or if you later change your host or pool to synchronize with a different update channel), you are prompted to synchronize your host or pool with the update channel immediately. In the dialog box that opens, select Yes, Synchronize if you want to synchronize your host or pool with the update channel immediately.
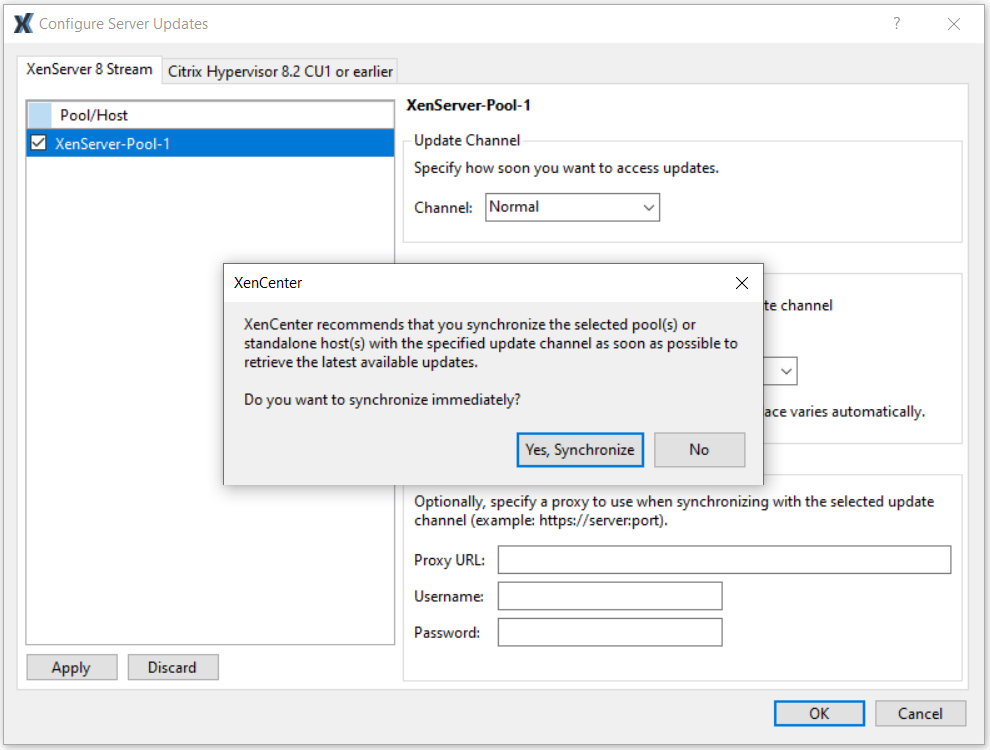
Alternatively, you can choose to synchronize your host or pool with the update channel at a later date. To synchronize your host or pool later, go to the Updates section under your pool’s General tab and select Synchronize Now or right-click on your pool and select Updates > Synchronize with update channel.
-
As soon as your pool synchronizes with the update channel, apply the downloaded updates to your pool by using the Install Updates wizard. For more information, see Apply updates to your pool.
After configuring your XenServer pool or host, you can find the following information in XenCenter, in the Updates section under the General tab of your pool or host:
- The update channel you are subscribed to
- The last time your pool synchronized with the update channel
- The checksum of that synchronization
- The checksum of the last update you applied
Offline Updates
Prerequisites
- Your host must be installed with the ISO published on October 7, 2024, or later.
- You must use XenCenter version 2024.4.0 or later to apply update bundles.
Follow these steps to configure Offline Updates:
-
Download the latest update bundle from the following page using your dedicated internet-connected machine: Download XenServer update bundles.
-
Transfer the update bundle to a location accessible from XenCenter.
-
In XenCenter, on the Tools menu, select Configure Updates. Alternatively, go to the Updates section under your pool’s General tab and select Configure Updates or right-click on your pool and select Updates > Configure Updates. The Configure Server Updates window opens.
-
On the XenServer 8.4 tab, select the pools or hosts that you want to configure.
-
Under Update Channel, select Offline to configure your host or pool to use the Offline update channel. Click OK.
-
You are prompted to upload an update bundle to your pool immediately.
To upload an update bundle immediately, click Yes and in the window that opens, navigate to the location of the downloaded update bundle
.xsbundlefile on your computer and select it. Click Next.Alternatively, you can choose to upload an update bundle at a later date. To upload an update bundle later, go to the Updates section under your pool’s General tab and select Upload bundle or right-click on your pool and select Updates > Upload bundle. The Select update bundle file window opens and you can select your
.xsbundlefile. You can also upload an update bundle using the Install Updates wizard. For more information, see Apply updates to your pool. -
Review available updates for your pool and check if there are any update tasks required before or after applying updates. For more information, see View available updates for your pool.
-
Apply the updates to your pool by using the Install Updates wizard. For more information, see Apply updates to your pool.
After configuring your XenServer pool or host, you can find the following information in XenCenter, in the Updates section under the General tab of your pool or host:
- The update channel your XenServer pool or host is configured to use
- The last time you uploaded an update bundle
- The checksum of that update bundle
- The checksum of the last update you applied
Update from a remote pool
This method enables you to update a pool or standalone host to the same level of updates as another pool (referred to as the “remote pool”). A remote-pool update synchronizes the host or pool with the remote pool and updates from update files held on the remote pool coordinator. Use this process to more easily join a new host to an existing pool by matching that pool’s update level.
For a remote pool to be used as an update channel by a pool or standalone host, it must meet the following prerequisites:
- The remote pool must be at a more recent level of updates than the standalone host.
- The remote pool must have the latest synchronized updates applied to it.
- The pool coordinator has not changed since the remote pool was last updated.
Configure a remote pool as an update channel
Follow these steps to configure your host or pool to use another pool as an updates channel:
-
In XenCenter, on the Tools menu, select Configure Updates. Alternatively, go to the Updates section under your pool’s General tab and select Configure Updates or right-click on your pool and select Updates > Configure Updates. The Configure Server Updates window opens.
-
On the XenServer 8.4 tab, select the pools or hosts that you want to configure.
-
Under Update Channel, select the remote pool you want to synchronize with from the section Channels on other pools or standalone servers. Click OK.
-
Click Apply to apply the configuration changes to your XenServer pool and then repeat the above steps to configure updates for the rest of your XenServer pools.
-
If you are happy with the configuration changes to your pools, click OK to save your changes and close the Configure Server Updates window. When you first set up your host or pool with an update channel (or if you later change your host or pool to synchronize with a different update channel), you are prompted to synchronize your host or pool with the update channel immediately.
-
In the dialog box that opens, select Yes, Synchronize if you want to synchronize your host or pool with the update channel immediately.

Alternatively, you can choose to synchronize your host or pool with the update channel at a later date. To synchronize your host or pool later, go to the Updates section under your pool’s General tab and select Synchronize Now or right-click on your pool and select Updates > Synchronize with update channel.
-
As soon as your pool synchronizes with the update channel, apply the downloaded updates to your pool by using the Install Updates wizard. For more information, see Apply updates to your pool.
After configuring your XenServer pool or host, you can find the following information in XenCenter, in the Updates section under the General tab of your pool or host:
- The update channel you are subscribed to
- The last time your pool synchronized with the update channel
- The checksum of that synchronization
- The checksum of the last update you applied
View available updates for your pool
XenCenter issues notifications about available updates for your hosts and pools under the Updates tabs in the Notifications view. The Updates tabs are split into XenServer 8.4 updates and Citrix Hypervisor updates.
The XenServer 8.4 Updates tab refreshes in the following scenarios:
-
For hosts and pools subscribed to the Early Access or Normal update channel, the tab refreshes based on the synchronization schedule you’ve set (either daily or weekly on a specific day).
Alternatively, you can fetch the latest available updates for your hosts and pools by manually synchronizing with the Early Access or Normal update channels.
-
For hosts and pools configured for Offline Updates, the tab refreshes each time you upload an update bundle to the host or pool.
Alternatively, you can fetch the latest available updates for your hosts and pools by uploading the latest update bundle to your host or pool.
To view the latest updates available for pools configured to apply updates from the CDN, synchronize your XenServer pool with the update channel. You can do this in XenCenter® from the following places:
- In the By Server view of the Updates tab, you can choose to Synchronize All to synchronize all pools managed by XenCenter or Synchronize Selected to synchronize the selected pools.
- Alternatively, go to the Updates section under your pool’s General tab and select Synchronize Now or right-click on your pool and select Updates > Synchronize with update channel.
To view the latest available updates for pools configured for Offline Updates, upload the latest update bundle to your pool. You can do this in XenCenter from the following places:
- In the By Server view of the Updates tab, you can choose to Upload Bundle to All to upload a bundle to all pools managed by XenCenter that use the Offline channel or Upload Bundle to Selected to upload a bundle to the selected pools.
- Alternatively, go to the Updates section under your pool’s General tab and select Upload bundle or right-click on your pool and select Updates > Upload bundle.
You can then review all updates available for your XenServer 8.4 pools. The types of updates are:
- Security fixes
- Bug fixes
- Improvements
- New features
- Preview features
-
Foundational changes
Note:
Foundational changes are non-customer visible groundwork changes to maintain and improve the product.
In the main panel, use the View option to choose whether the updates are displayed By Server or By Update.
By server
Updates are grouped by host and type of update.
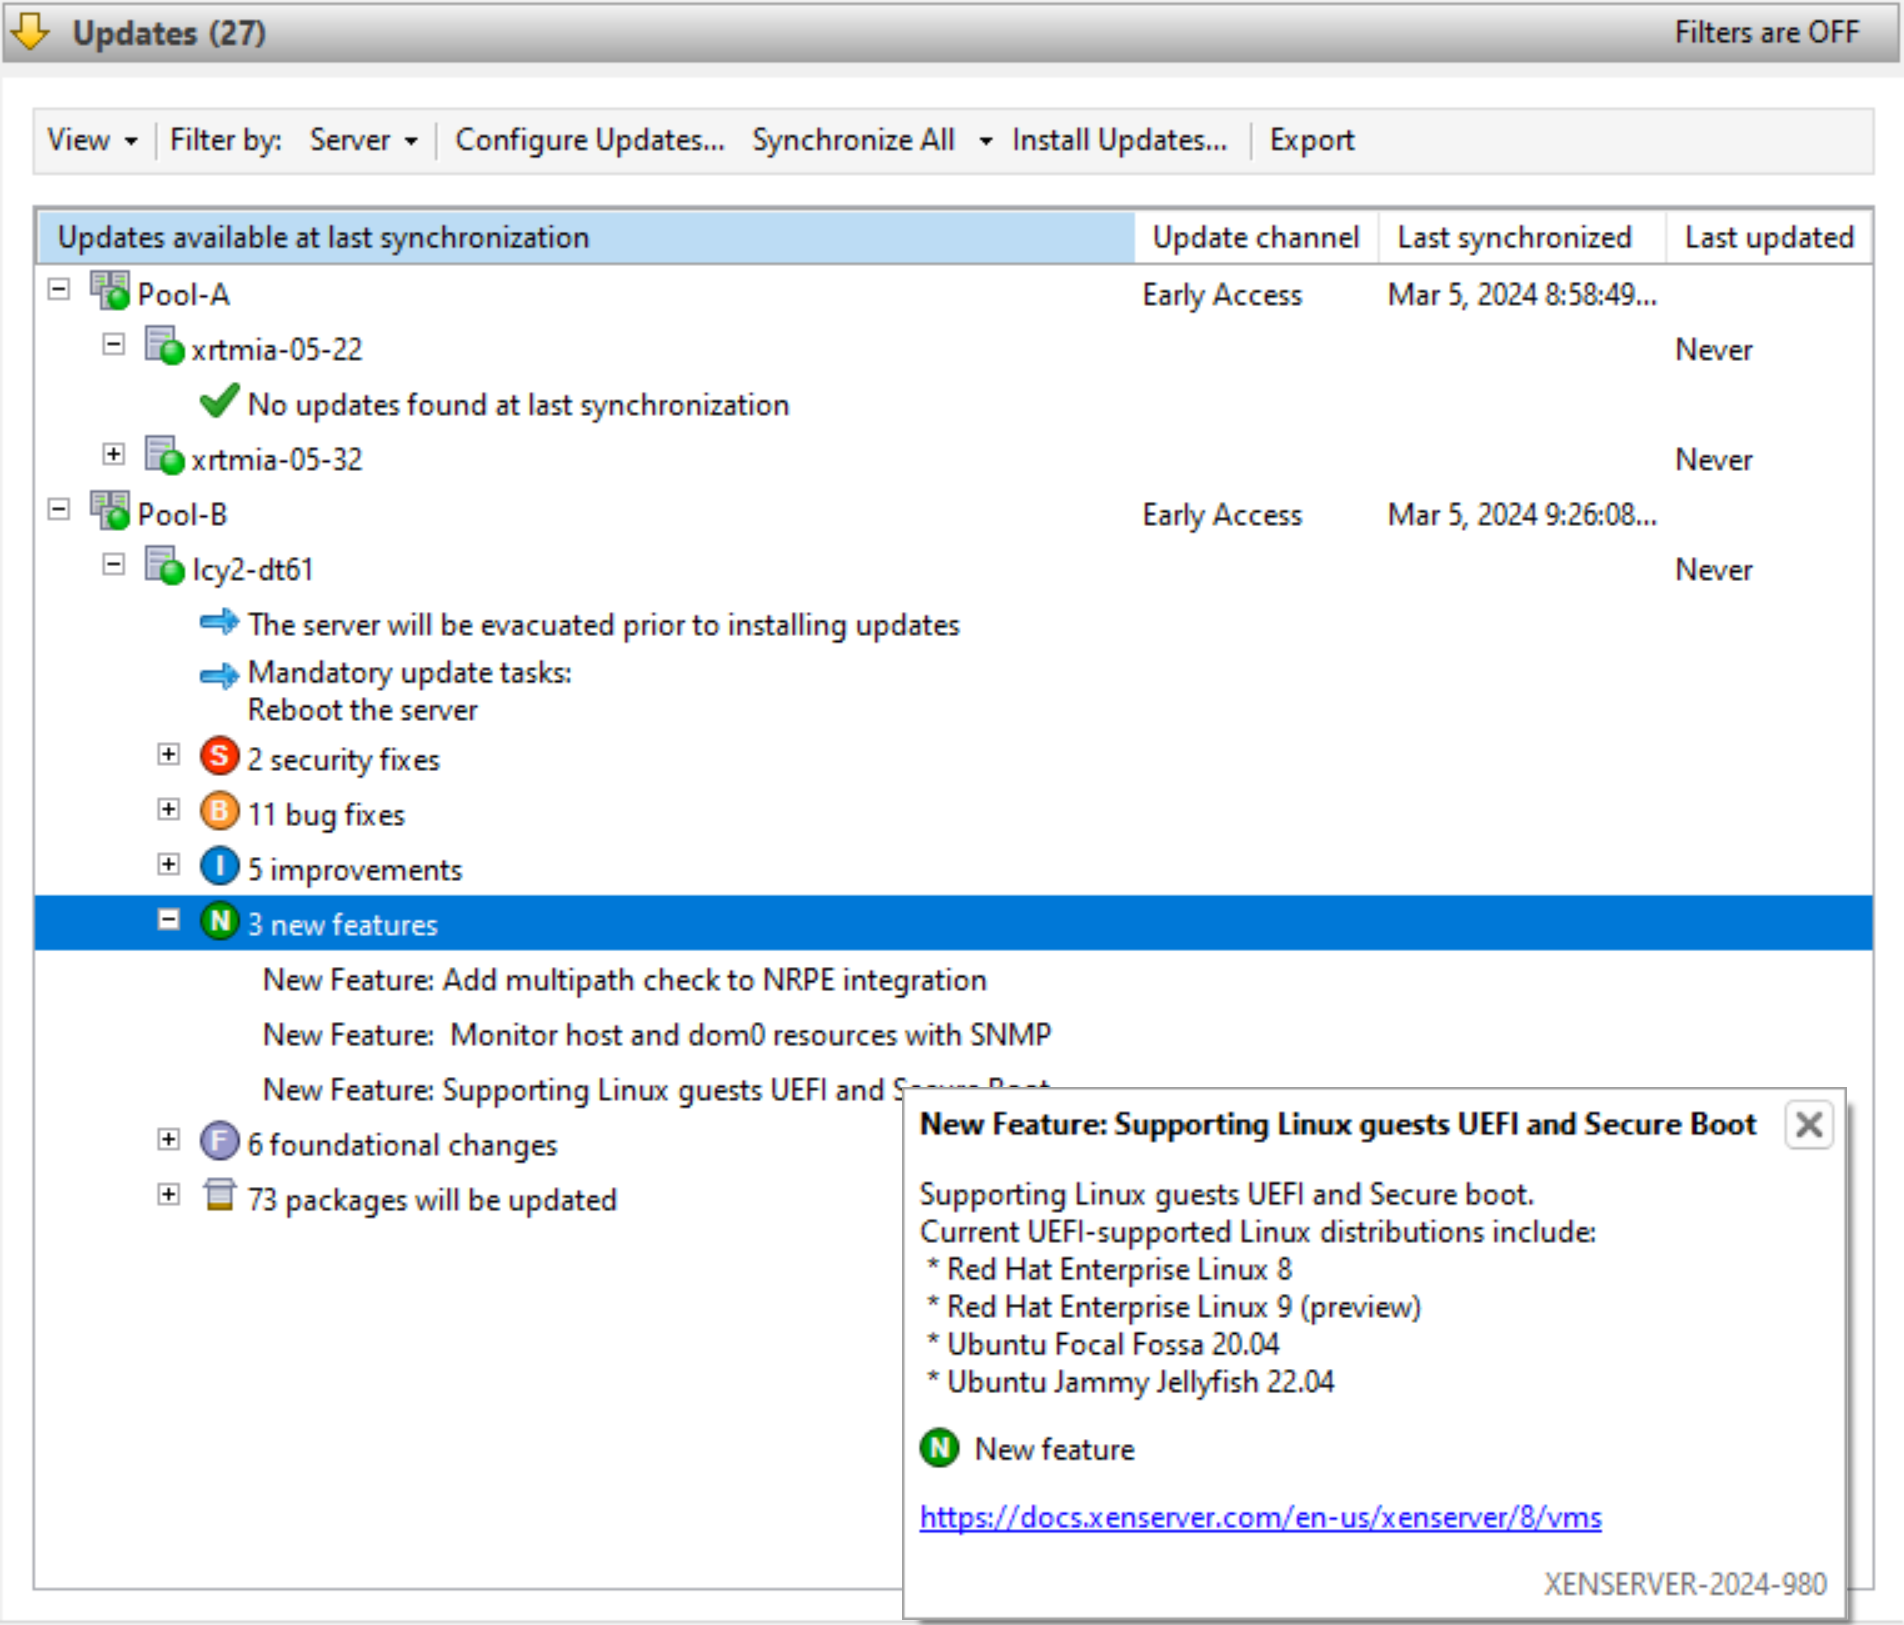
You can filter the update information by server. Select an update and hover over it to view detailed information about the update.
To view this information about your available updates offline, select Export All to export the information as a .md file. The contents of the .md file are grouped by pool and then host. For each host, the file lists the following information:
- Any update tasks for this host or its VMs. For more information about mandatory, recommended, and full effectiveness tasks, see Understand the guidance categories and update tasks.
- Whether these updates contain live patches that can be applied to this server
- Updates grouped by update type
- The update name
- A description of the update
- A list of the RPMs to be updated on the host
By update
All updates are listed chronologically in order of release.
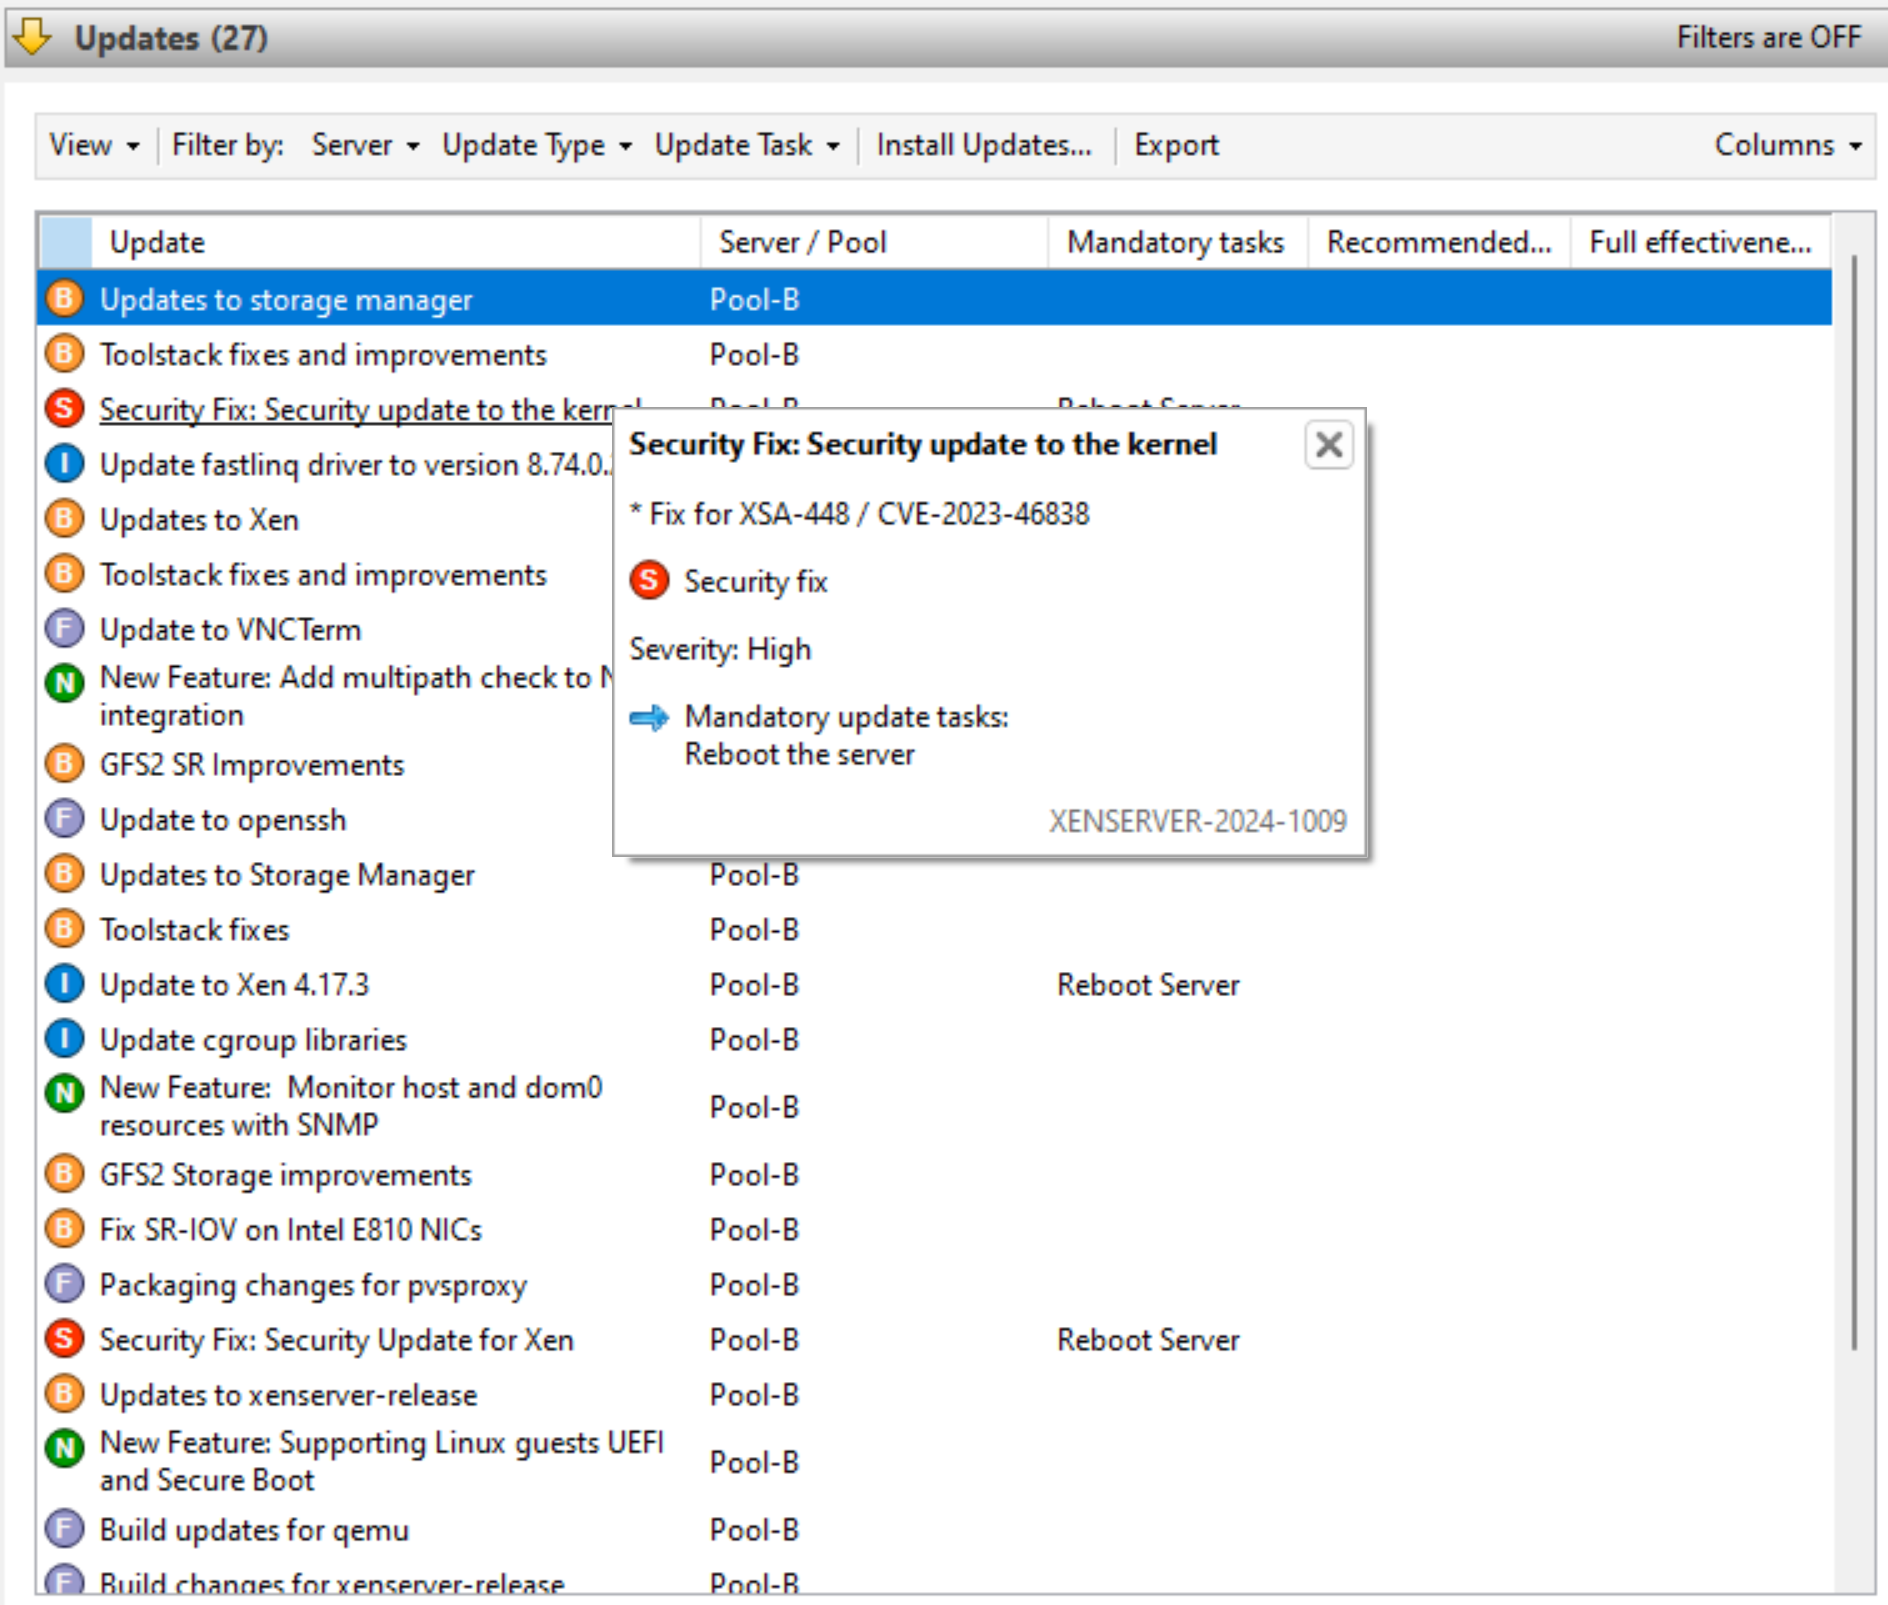
You can filter the update information by the server it can be applied to, by the update type, and by any update tasks that apply to it. Select an update and hover over it to view detailed information about the update.
To view this information about your available updates offline, select Export All to export the information as a .csv file. The .csv file contains the following information:
- The update type
- The update name
- The servers that this update can be applied to
- Whether the update includes a live patch that can be applied to the servers
- The mandatory, recommended, and full effectiveness tasks
For more information about mandatory, recommended, and full effectiveness tasks, see Understand the guidance categories and update tasks.
- To apply the updates to your hosts or pools, select Install Updates to open the Install Updates wizard. For more information, see the following section Apply updates to your pool.
Understand the guidance categories and update tasks
Some tasks (such as evacuating or rebooting your hosts) might be required before and after applying updates to your pool. Sometimes, there are no update tasks required.
Guidance categories
XenServer® tries to minimize the disruption to your VMs that these update tasks might cause by categorizing the tasks into Mandatory, Recommended, Full-effectiveness, and Live patch. These categorizations enable you to judge whether an update task that might cause downtime or minor disruption for your hosts or VMs is necessary for your environment and risk profile.
Updates can have tasks listed in more than one of these categories. For example, an update might require that you restart the host to get the full-effectiveness of the update, but recommend restarting the toolstack to get most of the benefit of the update with less potential disruption to the pool.
During the update process, you can choose to carry out one of the following three levels of tasks:
- Mandatory
- Mandatory + Recommended
- Mandatory + Recommended + Full-effectiveness
Mandatory
Mandatory tasks must be performed after an update otherwise the system might fail at runtime. These actions are required to enable critical fixes and ensure that your environment is secure and stable. When you apply updates, XenCenter® performs these tasks. You cannot opt out of mandatory tasks.
Recommended
Recommended tasks are the tasks that we recommend you perform to get the benefit of the majority of features and fixes delivered in the updates. When you apply updates, these tasks are selected by default in XenCenter, but you can opt out of performing them. If you choose not to perform these tasks now, they are listed in the pending tasks for the applicable pool, host, or VM.
Why perform the recommended tasks:
- These tasks are the ones that ensure a secure, stable XenServer environment.
Why opt out of the recommended tasks:
- After reviewing the detailed information for the updates, you judge that the risk of not fully applying these updates now is acceptable.
- The recommended tasks cause unwanted disruption to your VMs now.
Full-effectiveness
Full effectiveness tasks are required to get the benefit of the related update. The updates that have full-effectiveness tasks associated with them are usually relevant only to users on certain hardware or using specific features.
Review the update information to understand whether these tasks are required for your environment. When you apply updates, these tasks are not selected by default in XenCenter, but you can choose to perform them during the update if you believe the update applies to your environment or configuration. If you choose not to perform these tasks now, they are listed in the pending tasks for the applicable pool, host, or VM.
Why perform the full-effectiveness tasks:
- The updates that have full-effectiveness tasks are relevant to your hardware, environment, or configuration.
Why remain opted out of the full-effectiveness tasks:
- The updates that have full-effectiveness guidance are not relevant to your hardware, environment, or configuration.
- The full-effectiveness tasks cause unwanted disruption to your VMs now.
- You do not need the benefits of these updates right now.
If the full-effectiveness tasks apply to your environment, but you have opted to defer them, plan to complete these tasks during a suitable maintenance window to maintain the stability of your environment.
Live patches
Updates to certain components can include a live patch. A live patch enables updates to be applied to core components without requiring a host reboot.
Whether a live patch can be applied to your hosts depends on the version of the component that was installed when the hosts were last rebooted. If an update can be applied as a live patch to your hosts, the live patch guidance replaces the recommended guidance.
Example:
You have two pools. Pool A is updated to a recent level. Pool B has not been updated for some time. We release a new update that has the recommended update task “Restart host” and the live patch update task “Restart toolstack”.
In pool A, the live patch can be applied to these more up-to-date hosts. XenCenter recommended guidance shows “Restart toolstack”. The less disruptive task from the live patch guidance overrides the recommended guidance.
In pool B, the live patch cannot be applied to the hosts as they are at an older level. XenCenter recommended guidance shows “Restart host”. The recommended guidance remains applicable. The live patch guidance is irrelevant in this case.
Sometimes only some of the fixes in an update are enabled when the update is applied as a live patch. In this situation, you might still see a recommended reboot for an update even though the live patch applies. Review the update details to understand whether you need all fixes in the update or just those fixes enabled by the live patch. You can then use this information to choose whether to perform the tasks. For more information, see View available updates for your pool.
Update tasks
Applying updates might require you to complete one or more tasks, either before or after the updates are applied. These tasks can appear in any guidance category.
Update tasks for your host
Tasks required before applying updates:
- Evacuate server: All VMs must be migrated off the XenServer host or shutdown before applying the update. To complete this task, XenCenter migrates any VMs off the host. While this task is in progress, the XenServer pool is operating at reduced capacity as one host is temporarily unavailable to run VMs. This task is sometimes carried out as part of the ‘Reboot host’ task.
Tasks required after applying updates:
-
Reboot server: The XenServer host must be restarted. Any VMs are migrated off the host and the host is restarted. While this task is in progress, the XenServer pool is operating at reduced capacity as one host is temporarily unavailable to run VMs.
-
Restart toolstack: The toolstack on the host must be restarted. If performed on the pool coordinator, the connection to the pool is temporarily lost. Restarting on other hosts has no visible effect on the pool’s state.
Update tasks for your VM
Some updates provide new features for your VMs. These updates might require the following tasks on your VMs:
-
Reboot VM: The VM must be restarted. In XenCenter, the VM displays a red stop icon (square on red) while restarting. Once the task is complete, the green play icon appears, indicating the VM is running. During the reboot, the VM is unavailable to end users.
-
Restart device model: The device model for VMs on the updated host must be restarted. In XenCenter, the VM shows a yellow play triangle while the device model restarts. Once complete, the green play icon appears. During this time, you cannot stop, start, or migrate the VM. The end user of the VM might experience a brief pause and resume in their session. To support this task on a Windows VM, the VM must have XenServer VM Tools for Windows installed.
Apply updates to your pool
The update installation mechanism in XenCenter® applies the updates to your hosts and pools using the Install Updates wizard. During the process, XenCenter automatically works out the least impactful action required after applying all available updates. The Install Updates wizard automatically performs these steps:
- If required, it migrates VMs off each host.
- If required, it places the host in Maintenance mode.
- It applies the updates.
- If required, it runs any necessary update tasks such as rebooting the host, restarting the toolstack, or rebooting the VMs.
- It migrates the VMs back to the updated host.
Any actions that are taken at the pre-check stage to enable the updates to be applied, such as turning off high availability, are reverted.
Before you start
Before you apply an update to your servers, pay careful attention to the following:
- Back up all your servers
- If the set of updates includes updates to a driver, ensure that the new version of the driver is compatible with your hardware and firmware. For more information, see the Hardware Compatibility List (HCL) and your hardware vendor documentation.
- Ensure that High Availability (HA) is not enabled on any pool where you intend to apply updates.
- Ensure that you are logged in to XenCenter® as a Pool Administrator or Pool Operator, or using a local root account.
Install updates
Updates from the CDN
The following section provides step-by-step instructions on applying updates to your internet-connected pools using the Install Updates wizard:
-
From the XenCenter® menu, select Tools and then Install Updates.
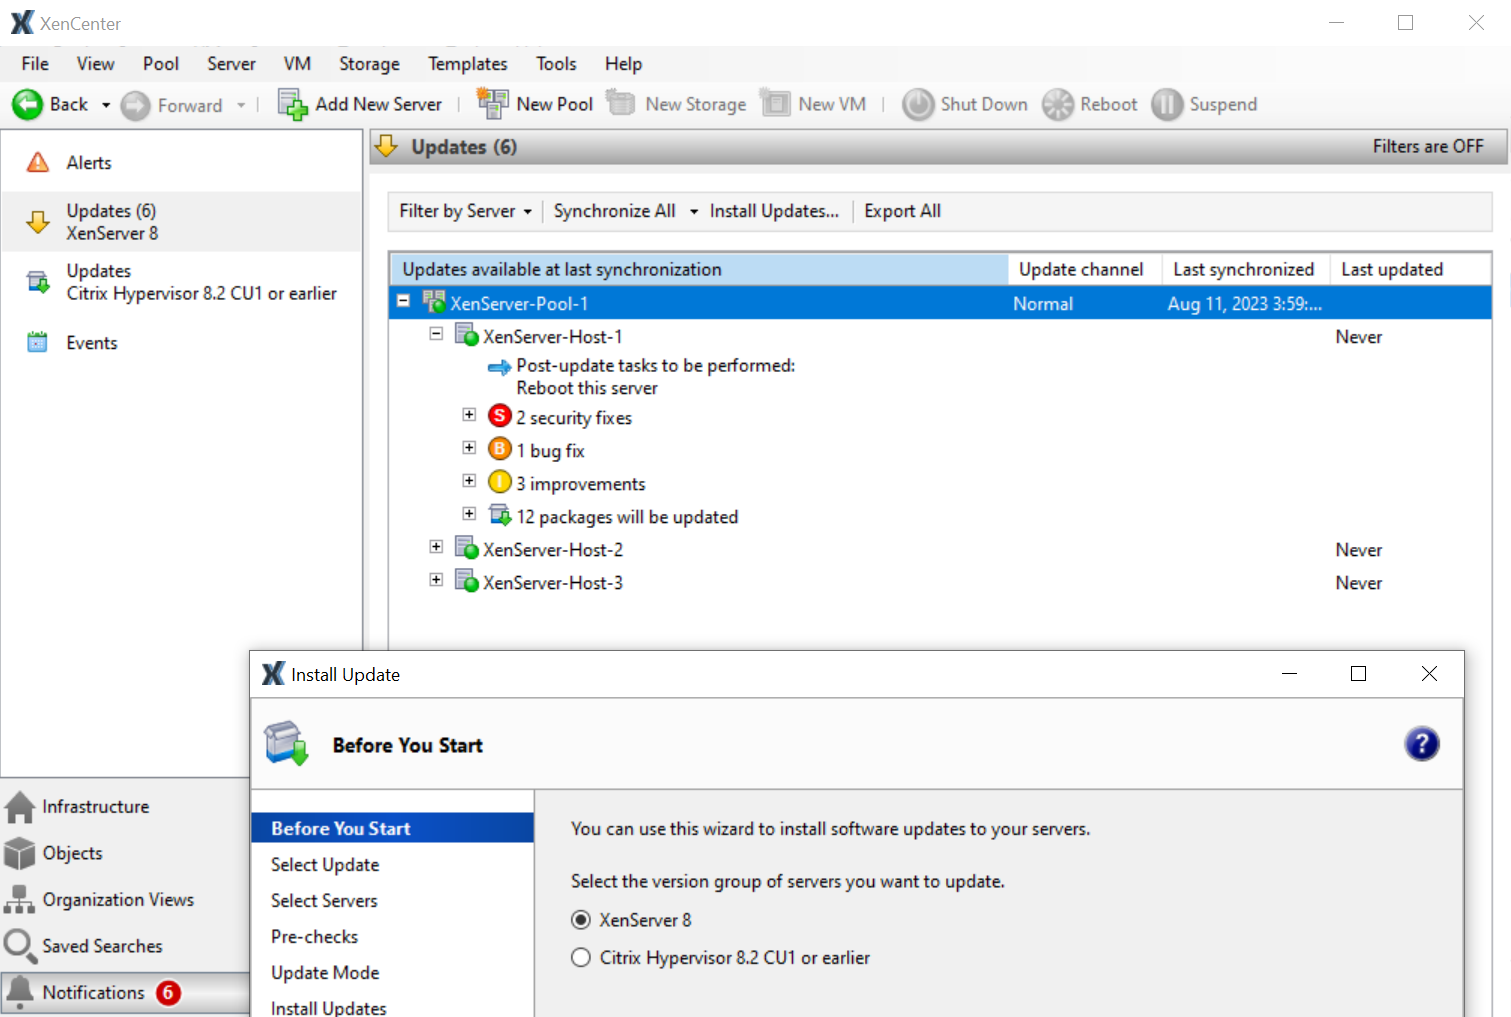
-
In the Install Updates wizard, select XenServer 8.4 and review the information on the Before You Start page. Click Next to continue.
-
Select Apply updates. Click Next to continue.
-
Select the XenServer® pools or hosts that you want to update. Click Next to progress to the next wizard page.
-
After updates are applied, some tasks, such as rebooting your hosts, might be required. On the Update Mode page, select the level of update tasks that you want XenCenter to automatically carry out after applying updates to your pool.
Tasks are categorized as Mandatory, Recommended, or Full Effectiveness under Tasks. If there are no update tasks required, the page displays a note saying No action required.
By default, XenCenter chooses the recommended level of update tasks. However, mandatory tasks are always performed and cannot be deselected.
To review these tasks in detail, minimize the wizard and go to the Notifications > Updates tab. For more information about the different types of update tasks and the guidance levels provided by XenCenter, see Understand the guidance categories and update tasks.
Click Next to progress to the next wizard page and begin pre-checks.
-
The wizard performs several pre-checks to verify that the updates can be applied on your host or pool. For example, you must have synchronized your host or pool with the update channel within the past week.
Follow the on-screen recommendations to resolve any pre-checks that have failed. If you prefer XenCenter to automatically resolve all failed pre-checks, select Resolve All. When the prechecks have been resolved, select Next to continue.
-
Click Install updates for XenCenter to begin installing updates for your host or pool.
-
The Install Updates wizard shows the progress of the update, displaying the major operations that XenCenter performs while updating each host in the pool.
Notes:
- If the update process cannot complete for any reason, XenCenter halts the process. This halt allows you to fix the issue and resume the update process by clicking the Retry button.
- If you select Cancel at this stage, the Install Updates wizard reverts any changes that you might have made to resolve failed pre-checks (such as pausing High Availability and Workload Balancing or suspending VMs).
Click Finish to complete the updates and close the Install Updates wizard.
Offline Updates
The following section provides step-by-step instructions for applying updates to pools configured for offline updates using the Install Updates wizard:
-
From the XenCenter menu, select Tools and then Install Updates.

-
In the Install Updates wizard, select XenServer 8.4 and review the information on the Before You Start page. Click Next to continue.
-
If you have previously uploaded an update bundle, select Apply updates. Otherwise, choose Select an update bundle or supplemental pack from disk and click Browse to navigate to the location of the downloaded update bundle
.xsbundlefile on your computer.Note:
You can download the latest update bundle from the following page using your dedicated internet-connected machine: Download XenServer update bundles. You then transfer the update bundle to a location accessible from XenCenter.
Click Next to continue.
-
Select the XenServer pools or hosts that you want to update. Click Next.
-
If you selected to upload an update bundle, the Install Updates wizard displays the progress of uploading the bundle to your pool or hosts on the Upload page. However, if you are applying a previously uploaded update bundle, this page is not displayed.
Note:
If you’ve just uploaded an update bundle that is older than the one currently applied to your pool, XenCenter displays that there are no available updates to apply and you cannot proceed further.
Once the process is complete, click Next to continue.
-
After updates are applied, some tasks, such as rebooting your hosts, might be required. On the Update Mode page, select the level of update tasks that you want XenCenter to automatically carry out after applying updates to your pool.
Tasks are categorized as Mandatory, Recommended, or Full Effectiveness under Tasks. If there are no update tasks required, the page displays a note saying No action required.
By default, XenCenter chooses the recommended level of update tasks. However, mandatory tasks are always performed and cannot be deselected.
To review these tasks in detail, minimize the wizard and go to the Notifications > Updates tab. For more information about the different types of update tasks and the guidance levels provided by XenCenter, see Understand the guidance categories and update tasks.
Click Next to progress to the next wizard page and begin pre-checks.
-
The wizard performs several pre-checks to verify that the updates can be applied on your host or pool.
Follow the on-screen recommendations to resolve any pre-checks that have failed. If you prefer XenCenter to automatically resolve all failed pre-checks, select Resolve All. When the prechecks have been resolved, select Next to continue.
-
Click Install updates for XenCenter to begin installing the updates to your host or pool.
-
The Install Updates wizard shows the progress of applying the updates, displaying the major operations that XenCenter performs while updating each host in the pool.
Notes:
- If the update process cannot complete for any reason, XenCenter halts the process. This halt allows you to fix the issue and resume the update process by clicking the Retry button.
- If you select Cancel at this stage, the Install Updates wizard reverts any changes that you might have made to resolve failed pre-checks (such as pausing High Availability and Workload Balancing or suspending VMs).
Click Finish to complete the updates and close the Install Updates wizard.
Complete any pending update tasks
After applying updates, complete any pending update tasks to ensure your hosts and VMs operate as expected.
Note:
Before applying updates, you can review the required update tasks on the XenServer 8.4 Updates tab in the Notifications view. For more information, see View available updates for your pool.
If you skip any tasks during the update process, the pending tasks for each pool, host, or VM appear in the Updates section of the General tab for the pool, host, or VM.
Pool pending tasks
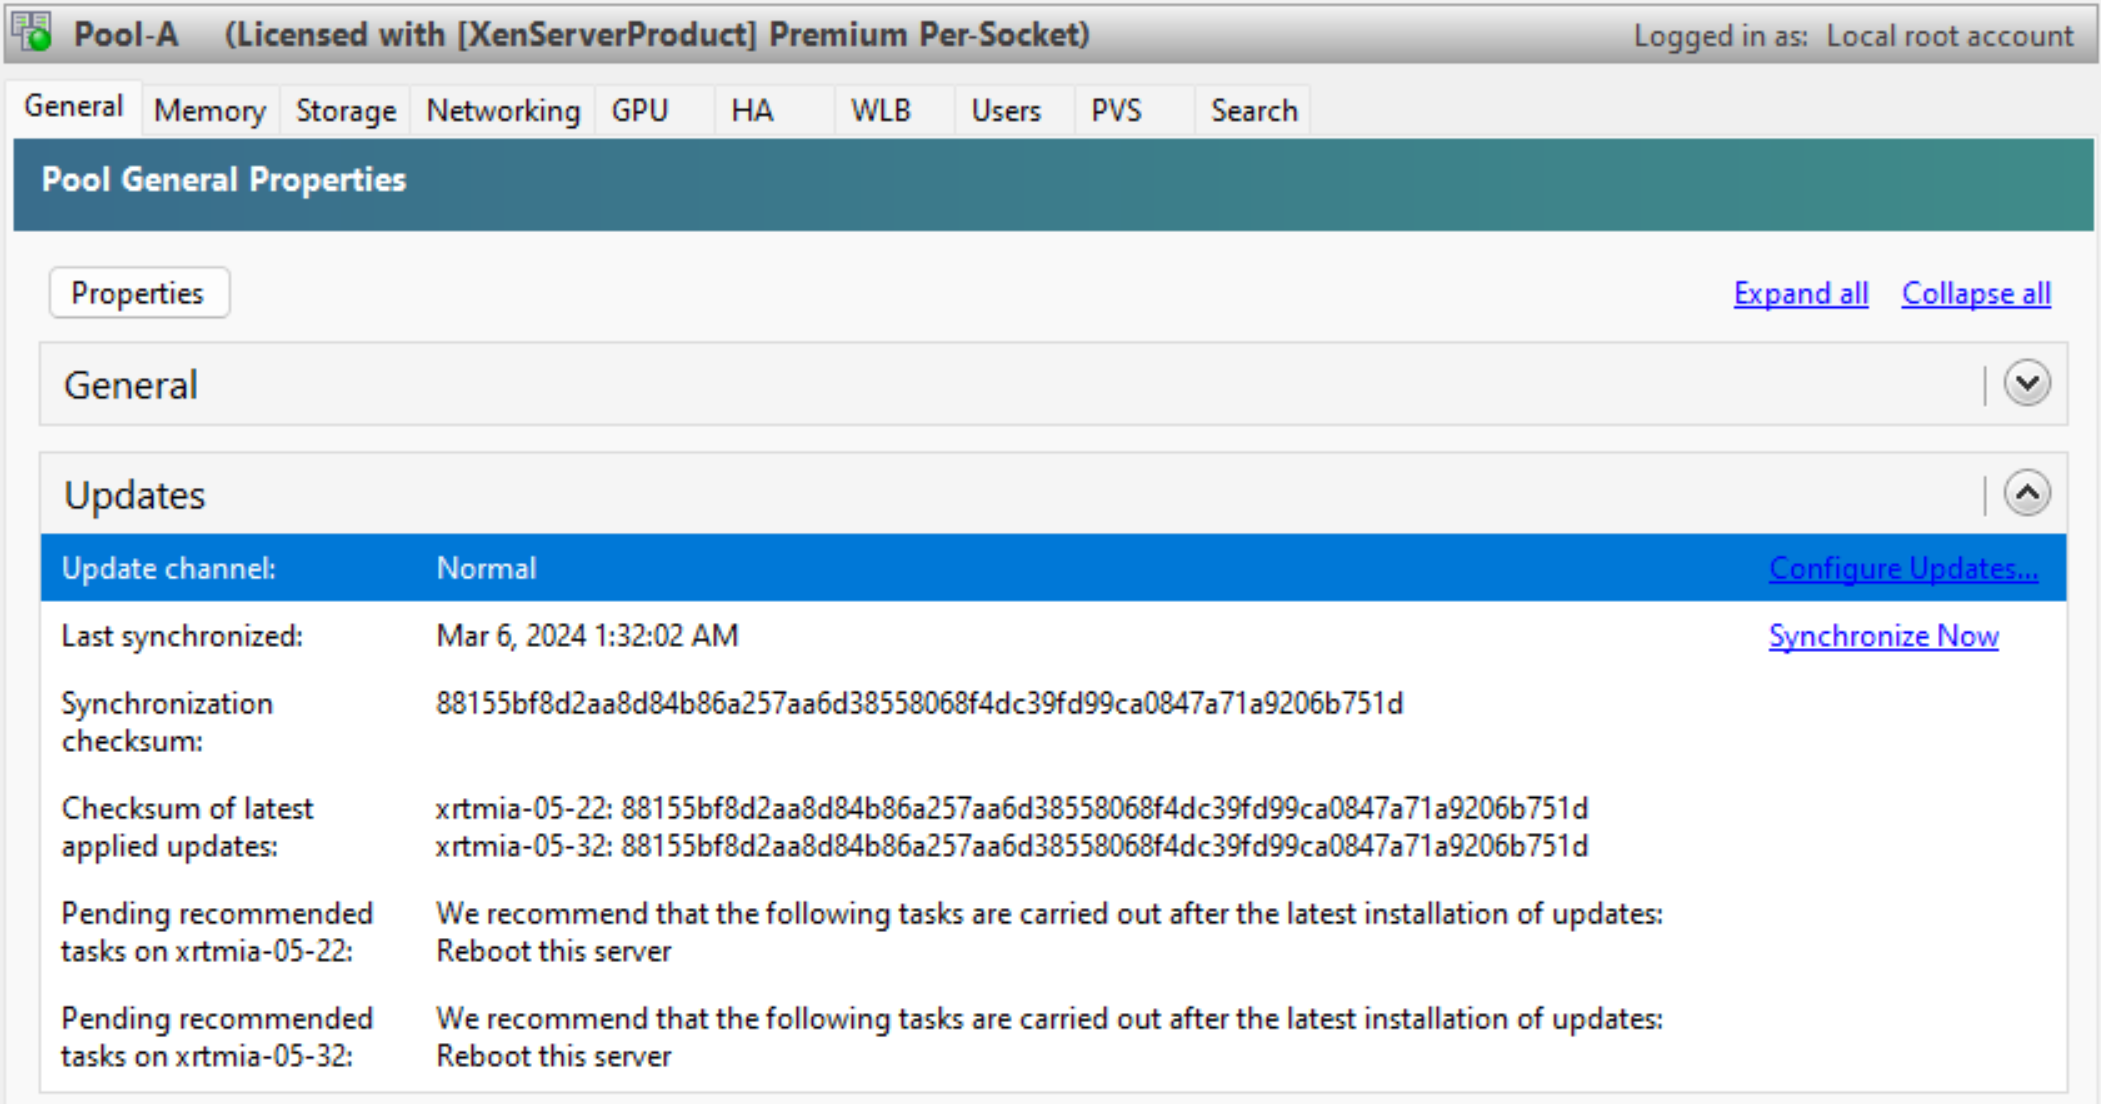
This section shows the pending tasks for all hosts in the pool.
It also shows a checksum that indicates the level that the current pool coordinator has synchronized to and checksums for each host that indicate the level of the updates installed. These checksums can provide useful information if you need to contact Technical Support.
Host pending tasks
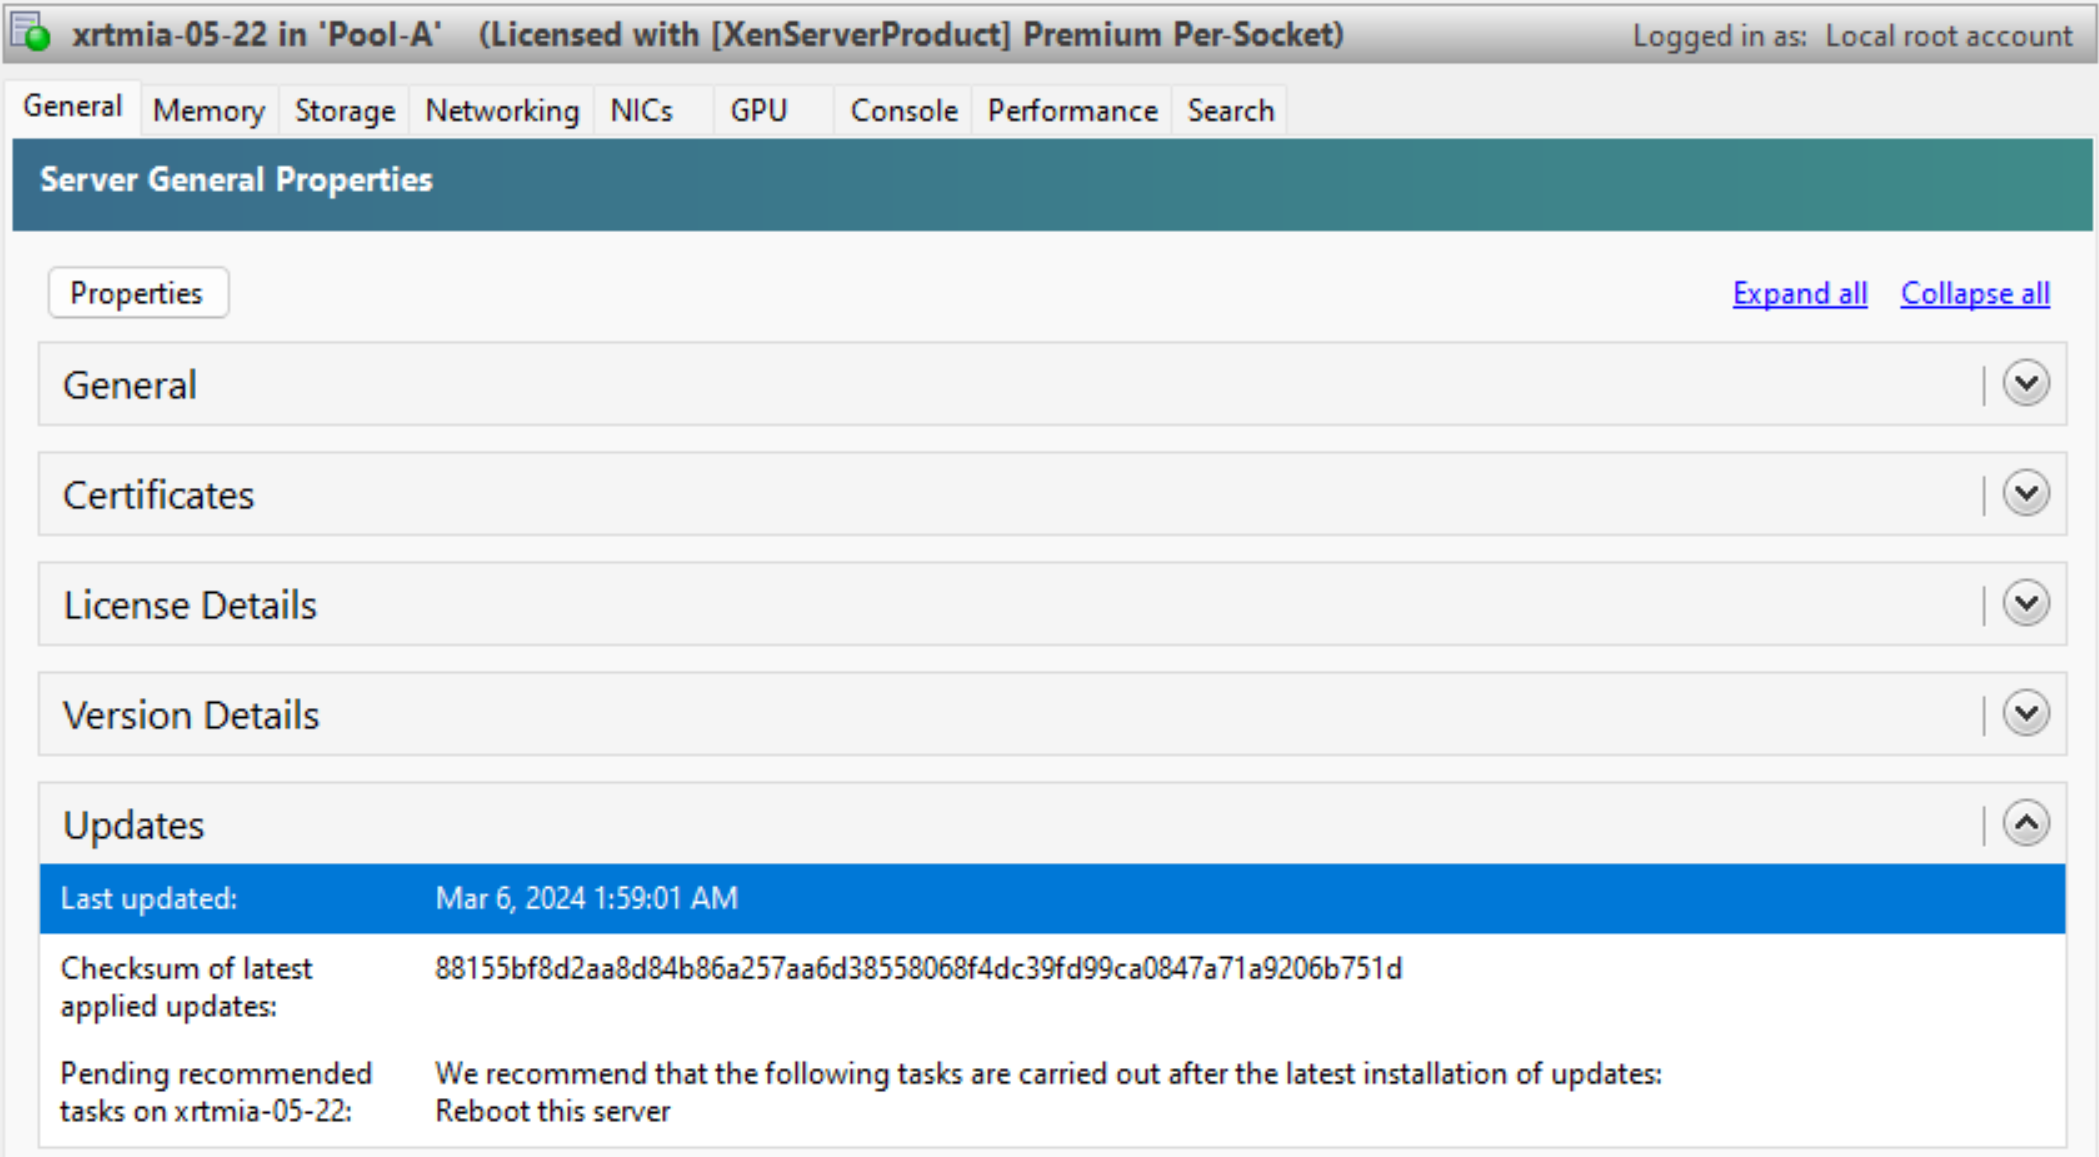
This section shows the pending tasks for the XenServer® host.
It also shows a checksum that indicates the level of the updates installed. This checksum can provide useful information if you need to contact Technical Support.
VM pending tasks
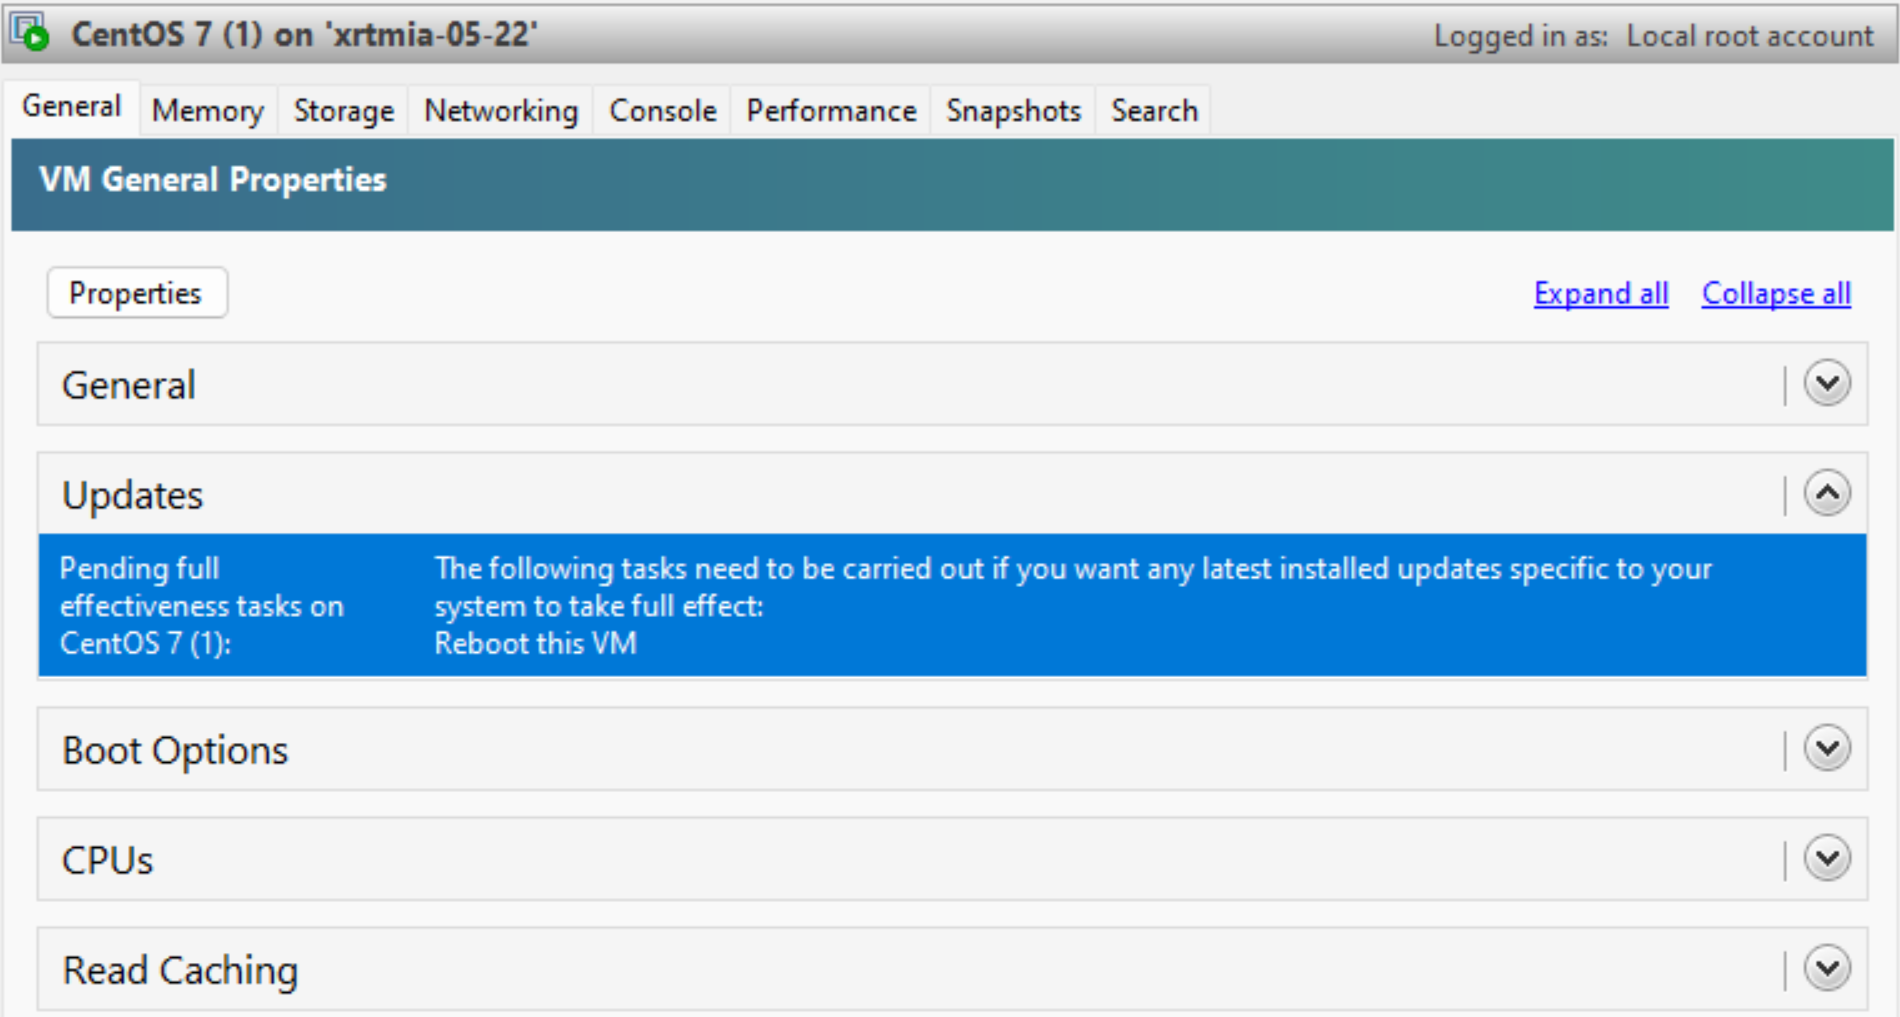
This section shows the pending tasks for a VM.